Users can "hold" their print job on a Ricoh multi-function device until they are ready to go to the machine and retrieve it. This prevents any sensitive information from sitting out on the machine, allowing access for passersby.
1. Access "Printing Preferences" for the Machine
Go to the Start Menu --> search for Printers & scanners
2. Select the Desired Printer
Locate the printer on which you would like to hold your print jobs. Click Manage, then select "Printing preferences."


3. Enable Hold Print Option
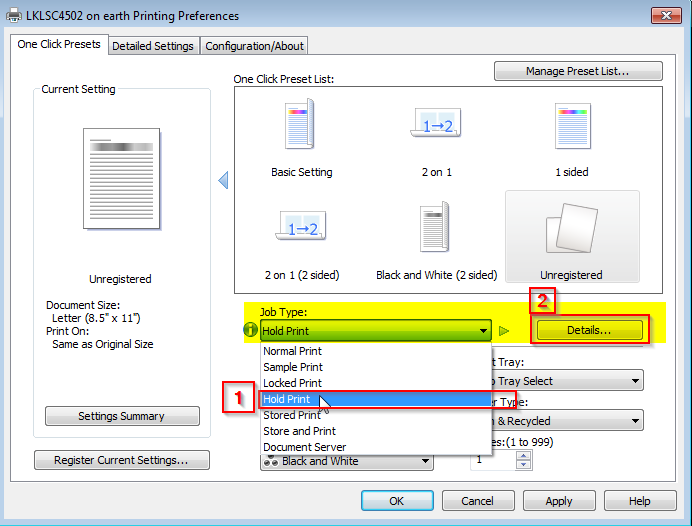
In the Printing Preferences window, under Job Type: select Hold Print*
*If you would like to prevent other users from printing your document, select Locked Print instead, then set a four- to eight-digit passcode (see second screenshot under Step #4).
Next to the Job Type field, click the "Details..." button

4. Set option to print using your user name
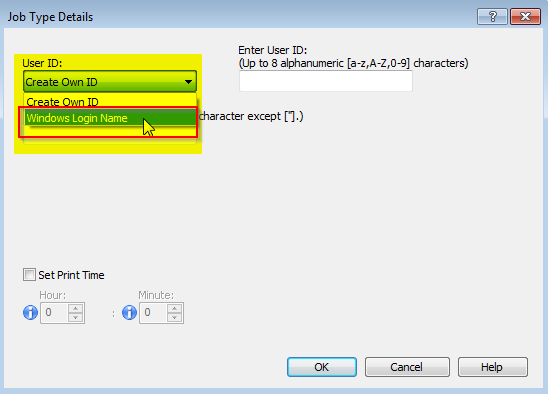
In the Job Type Details window, under "User ID:" select "Windows Login Name" -- your Windows user name will automatically populate in the next field.
*NOTE: If "Windows Login Name” is not an option, use “Create Own ID” and manually enter your Windows user name (e.g. jsmith)
Click OK twice to close out of the Devices and Printers window.

For Locked Print:

5. You are ready to print!
a. Start by printing a test page/sample document to the printer to make sure it is correctly holding your print jobs. When you go to print, you should still see a pop-up on your computer stating “This document was sent to the printer.”
b. When you arrive at the printer, press the Printer button on the machine.
c. On the screen, press the Print Jobs button then the Hold Print Jobs List button.
d. You should see your document in the list. Press the file you want to print, then press Print.
e. At the confirmation screen, press Yes and your document will print.
f. You can press Exit in the top-right corner of the screen to leave the Print Jobs window.
6. Summary Document
The attached Word document can be shared with/emailed to branch employees in addition to the above article.


